
dukDukz
[블록체인] 서명하는 방법 3가지 - 수업 ver 본문
# 서명하는 방법 3가지
(사용자 입장에서)
블체 네트워크에있는 contract 사용 직전에 하는 작업
1. 메타마스크를 통해서 확인(팝업창) - 사용자가 서명하는 방식
(어제 했던것처럼)
핫 월렛 (온라인 지갑)을 통해서 하는 방식
=> 지갑을 활용하여 서명하는 방식이라고 할 수 있다.
메마에 비밀키 저장하고있음
2. 사용자가 직접 서명하지만, Server를 거쳤다가 서명하는 방식
서명하겠다는 것을 컴퓨터 백서버에 (BE and DB)
사용자가 리엑트에 접근하면 사용자 로컬 메마가 블체에 연결시도
구매 버튼 클릭하면 리액트에서 함수 실행되고 이 내용을 백에 전달하고 백은 거기서 디비 작업을하고
백에서 리액트한테 서명을 받기 전 데이터를 건네주고 리액트는 사용자에게 그 내용을 알림창으로 띄워준다.
메마에 비밀키 저장하고있음
3. server 에서 서명까지 완료하는 작업
사용자 입장에서는 메마가 필요없음 BE 에서 데몬까지 가서 서명을 해주기 때문에
=> 거래소에서 많이 사용함
회원가입하면 지갑을 만들어주고 BE가 DB에 우리의 공개 비밀키를 다 갖고있음
서명할때 필요한 데이터가 바로 비밀키이다.
transaction / 돈 보낼때 확인 할때 비밀키 필요하다.
$ truffle unbox react
# truffle-config.js 설정
const path = require("path");

module.exports = {
  contracts_build_directory: path.join(__dirname, "client/src/contracts"),
  networks: {
    development : {
      host : "127.0.0.1",
      port : 7545,
      network_id : "*",
    },
    develop: {
      port: 8545
    }
  }
};
# metamask 연결 부분 -> ganache -> 이더 채워넣고
예제 솔리디티 작성하자.
contracts > SimpleStorage.sol
// SPDX-License-Identifier: MIT
pragma solidity >=0.4.21 <0.7.0;


contract SimpleStorage {
  uint storedData;

  event Change(string mesage, uint newVal);
  constructor() public {}

  function set(uint x) public {
    storedData = x;
    emit Change("set",x);
  }

  function get() public view returns (uint) {
    return storedData;
  }
}
컴파일 진행하자
$ truffle compile

$ truffle migrate

$ cd client && npm run start
App.js
에서 App 컴포넌트 지우고
const App =()=>{
    이 부분을 작성해준다.
    서명의 세가지 타입을 해줄거기 때문에 버튼 세개 함수 세개 만들기
}
작성하고
$ cd client

$ npm install @truffle/contract
const init = async () => {
    const contract = require('@truffle/contract')
    const web3 = await getWeb3()
    const [account] = await web3.eth.getAccounts()
    // const networkId = await web3.eth.net.getId()  //network id 값 가져올 수 있다.

    let simpleStorage = contract(SimpleStorageContract)
    simpleStorage.setProvider(web3.currentProvider)

    const Instance = await simpleStorage.deployed()

    console.log(Instance);
  }
배포한 코드까지 접근할 수 있도록 작업함 - 세팅 부분
이부분 외우거나 이해하기
reducer를 통해 Instance를 저장하자
const reducer = (state, action) => {
  switch (action.type) {
    case "INIT":
      let { web3, Instance, account } = action
      return {
        ...state,
        web3,
        Instance,
        account
      }
  }
}

const INIT_ACTIONS = (web3, Instance, account) => {
  return{
    type : 'INIT',
    web3,
    Instance,
    account
  }
}

const App = () => {
  const initialState = {
    web3: null,
    Instance: null,
    account: null
  }
  const [state, dispatch] = useReducer(reducer, initialState)
}
필요한 데이터를 저장할 수 있는 공간을 확보한거임
채워주는 작업은 init 안에서 작업
dispatch(INIT_ACTIONS(web3,Instance,account))그럼 다 state 에 다 들어간걸 확인할 수 있음
서명
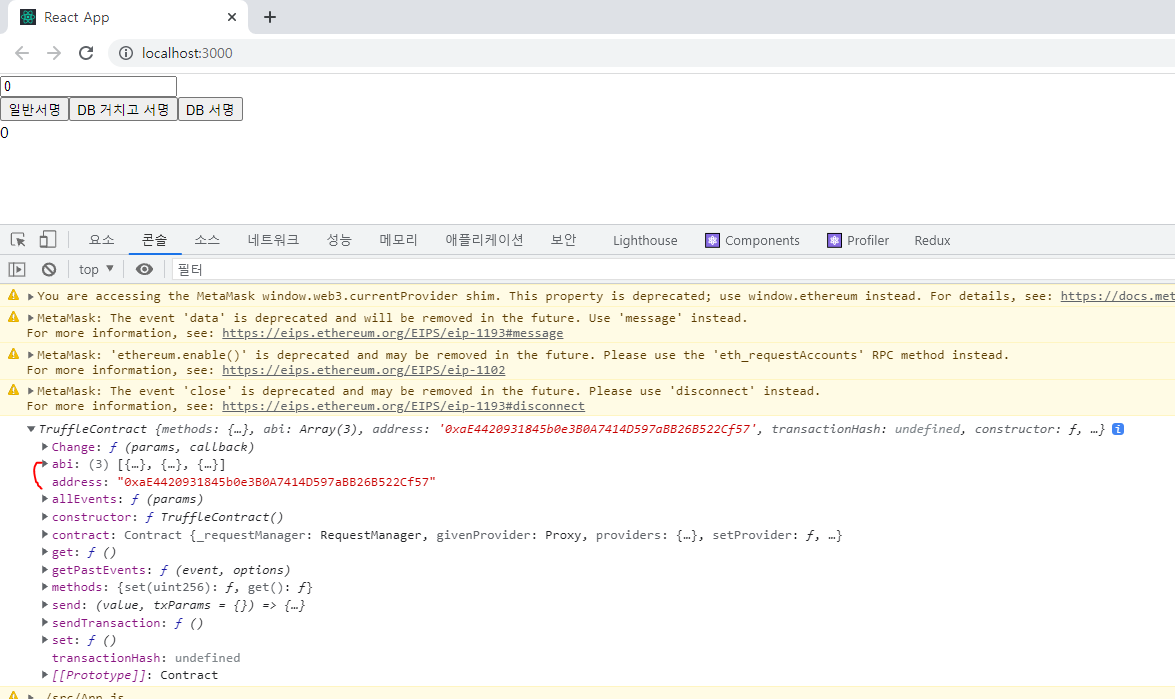
event로 받아서 처리하기
1. 직접서명
const send = async () => {
  const {account, Instance} = state
  if (value > 0) {
    setLoading(prev => !prev)

    // 비동기적 처리
    await Instance.set(value,{from:account})
    handleResult()
  }
}
이벤트 받아서 처리하기
init 함수 안에서
web3.eth.subscribe("logs",{address:Instance.address})
// 배포된 address
.on('data', log =>{
  console.log(log)
})
.on('error', err=>console.log(err))
콘솔로그중 data 부분을 보면 0x0000000 어쩌구가 왔고
handleResult()


이 부분 다 지워주고

.on('data', log =>{
      // console.log(log)
      handleResult(log,web3)
})


이렇게 바꾸고


const handleResult = (log,web3) => {
  // decodeLog 는 2개의 인자값이있다. 1. 데이터 형식 2. log.data
  // SimpleStorage.sol 의 event로 보내는거임

  const params = [
    {type:'string', name:'message'},
    {type:'uint256',name:'newVal'}
  ]

  const returnValues = web3.eth.abi.decodeLog(params,log.data)
  console.log(`returnValues : `,returnValues)
  setStorage(returnValues.newVal)
  setLoading(prev => !prev)
}

[SimpleStorage.sol]
function set(uint x) public {
  storedData = x;
  emit Change("set", x);
}
-> 이벤트
이벤트를 받은 결과물을 출력 해주는 것으로 바뀌었다.
handelResult 에서 이벤트 별로 switch를 하는게 좋다
switch(returnValues.message){
    case "set":
      setStorage(returnValues.newVal)
}
이런식으로...
2. 백앤드를 거치는 경우
sendAPI(){
web3.eth.sendTransaction(rawTx)
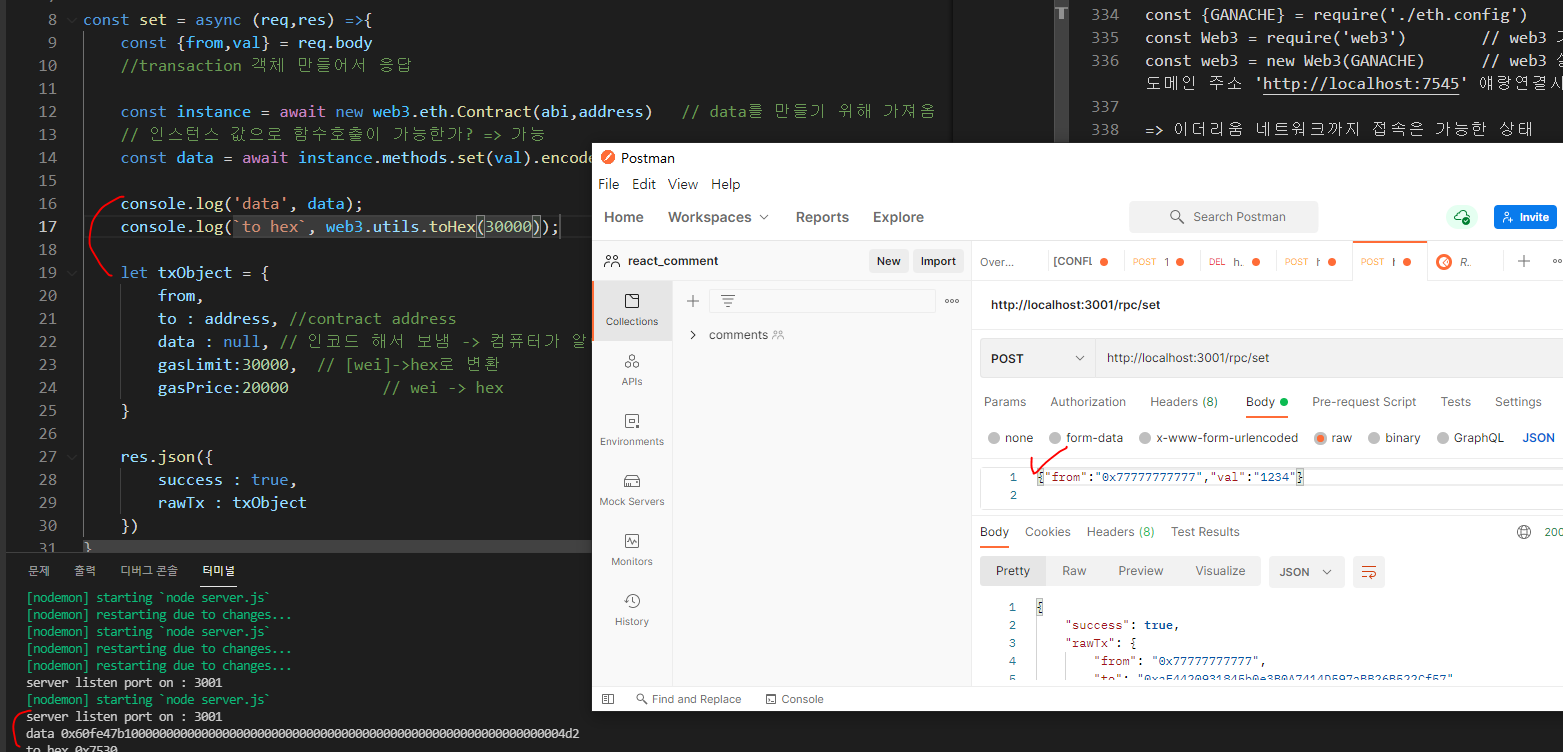
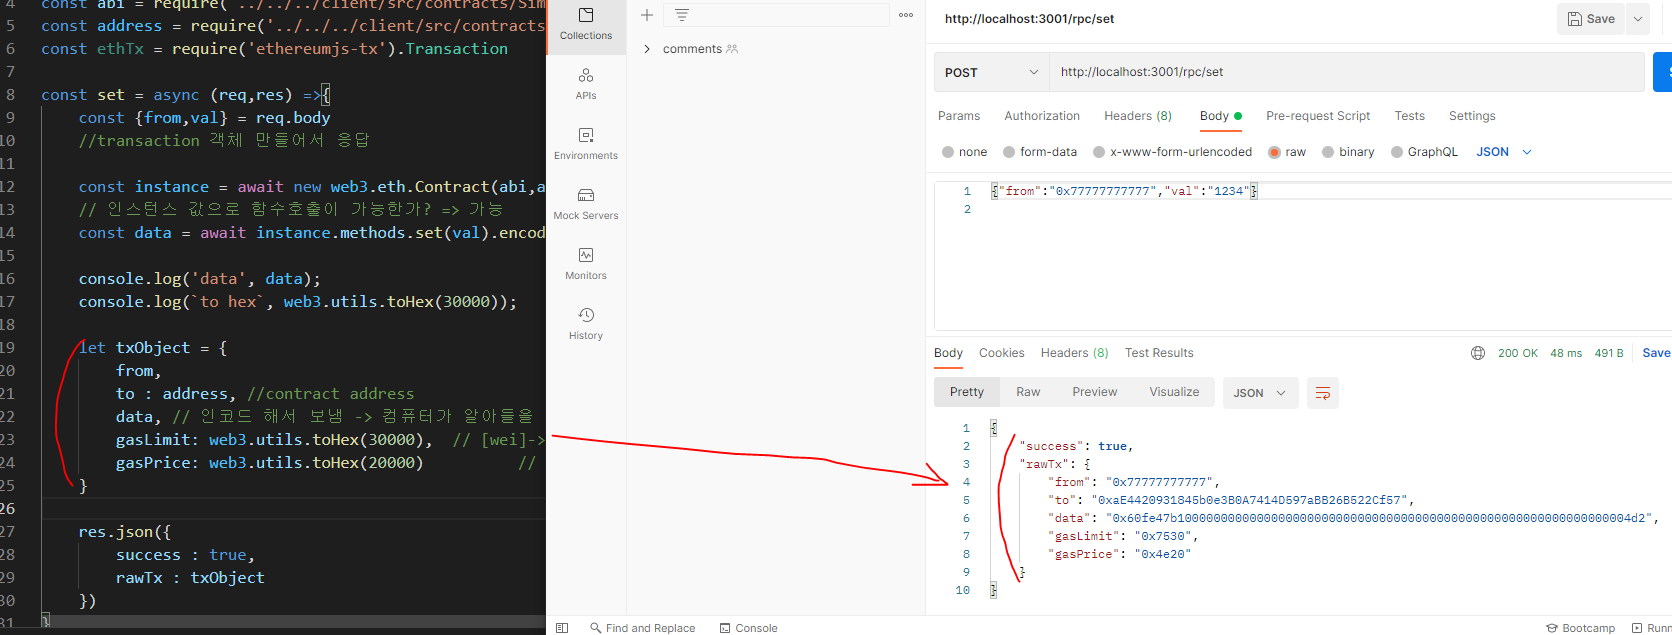
rawTx = {
"from" : "address 값",
"to" : "누구에게 보내는지",
"data" : "실질적 데이터 부분 16진수로 바꿔서(인코딩)",
"gasLimi" : "",
"gasPrice" : ""
}
}
https://web3js-kr.readthedocs.io/ko/latest/web3-eth.html#sendtransaction
web3.eth — web3.js 1.0.0 documentation
주석 When use the package ethereumjs-tx at the version of 2.0.0, if we don't specify the parameter chain, it will use mainnet, so if you wan to use at the other network, you should add this parameter chain to specify.
web3js-kr.readthedocs.io
=> 공식문서 참고
sendAPI
1. 백엔드에 요청
=> 비동기 통신 (axios)
=> cd client && npm i axios
App.js 에서 import axios from "axios"
2. 백엔드에 rawTx 객체를 반환해준다.
3. 반환받은 값을 sendTransaction() 을 실행한다. (실질적 서명)
# 백단 세팅
1. root 디렉토리에서 server 폴더 만들고
2. root 디렉토리에서 $ npm init
3. server > server.js 생성하고 기본적인 내용 작성
4. npm i body-parser cors express
+ ethereumjs-tx / web3 도 설치해야함
5. server > routes > index.js 생성
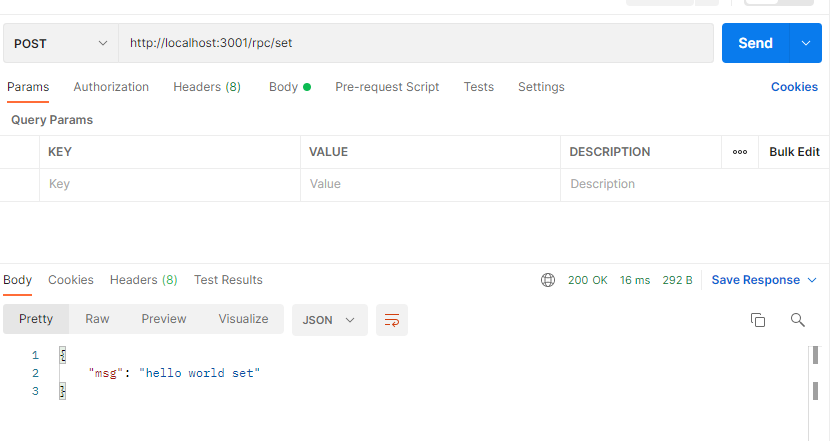
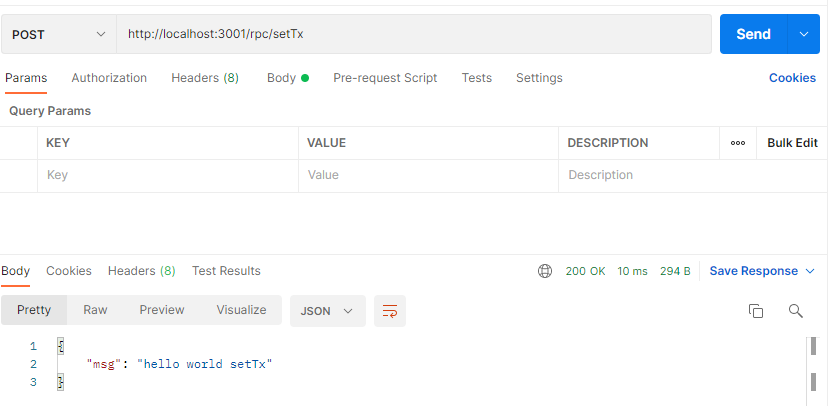
rpc.controller.js
const set = async (req,res) =>{
    res.json({msg:`hello world set`})
}

const setTx = async (req,res)=>{
    res.json({msg:`hello world setTx`})
}

module.exports={
    set,
    setTx
}
이렇게 작성하고
post man으로 실험해본다
App.js
 // DB 거치고 서명
  const sendAPI = () => {
    if (value > 0) {
      setLoading(prev => !prev)

      // 비동기적 처리
      // localhost:3001/rpc/set
     let result = await axios.post('http://localhost:3001/rpc/set',{from:account, val:value})
    }
  }
rpc.controller.js
to : contract address
[SimpleStorage.json]

  "networks": {
    "5777": {
      "events": {},
      "links": {},
      "address": "0xaE4420931845b0e3B0A7414D597aBB26B522Cf57",
      "transactionHash": "0x6634a245b2031098c4f00fa954c67fabe276ddcc4462be4363b77df2e83d04f9"
    }
  },
이걸 rpc.controller.js 에서 가져와보자
const address = require('../../../client/src/contracts/SimpleStorage.json').networks["5777"].address
이렇게 가져오면 된다.
data 는 어떻게 넣어줘야 할까?
배포한 set이라는 매서들르 인자값을 넣는 set(10) 얘를 바꿔줘야함
-> set 이라는 매서드는 어디있는가?
백앤드 기준으로 이더리움 매서드를 접근할 수 있는 방법은?
메타마스크와 web3 가 있다.
기본적으로 web3라이브러리 사용해야 한다.
const {GANACHE} = require('./eth.config')

const Web3 = require('web3')        // web3 가져오고

const web3 = new Web3(GANACHE)      // web3 실행시킴 가나쉬의 도메인 주소 'http://localhost:7545' 얘랑연결시킴
=> 이더리움 네트워크까지 접속은 가능한 상태
우리가 배포한 주소값 그 계정을 알아야함 -> contract address
const abi = require('../../../client/src/contracts/SimpleStorage.json').abi;

const instance = await new web3.eth.Contract(abi,address)
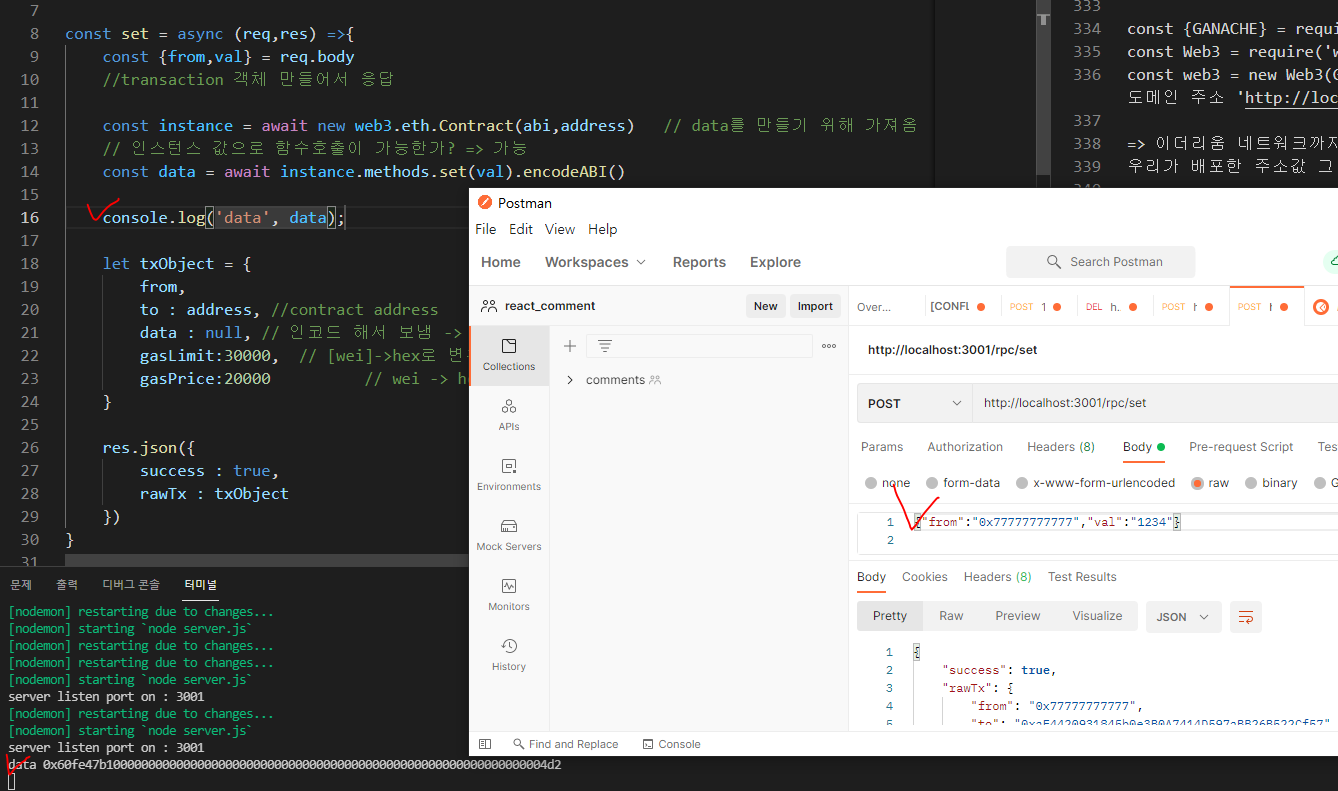
백으로 오는거 확인했고 이걸 이제 프론트로 보내볼 것이다.
App.js 와서
// DB 거치고 서명

  const sendAPI = async () => {
    const {web3, account} = state
    if (value > 0) {
      setLoading(prev => !prev)

      // 비동기적 처리
      // localhost:3001/rpc/set
      let result = await axios.post('http://localhost:3001/rpc/set',{from:account, val:value})
      console.log(result);

      if(result.data !== undefined && result.data.rawTx !== undefined && result.data.success == true){
        await web3.eth.sendTransaction(result.data.rawTx)
      }
    }
  }
3. Backend server 거치고 서명
App.js
// Backend server 거치고 서명

  const sendTx = async() => {
    const {account} = state
    if (value > 0) {
      setLoading(prev => !prev)

      // 비동기적 처리
      const result = await axios.post('http://localhost:3001/rpc/setTx',{from:account, val:value})
      // 프론트에서는 서버에 요청만 보내면 된다.
    }
  }
백은
rpc.controller.js
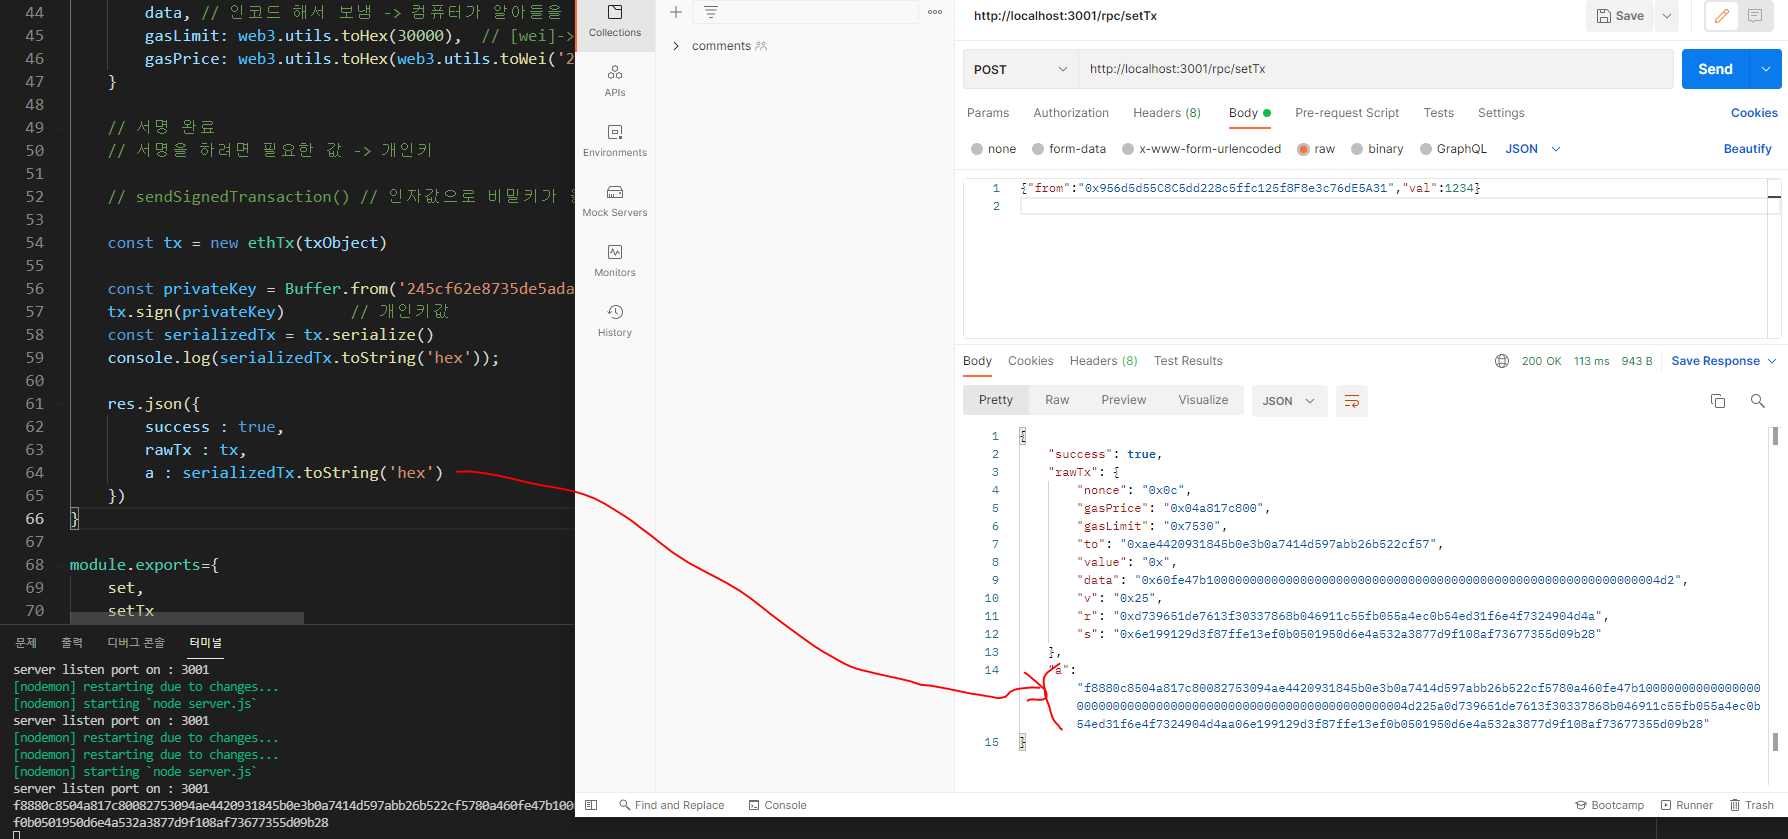
setTx 위에 set 과 동일 해서 코드 복붙하고 다른점은 nonce 가 추가 되었다는 것이다.
sendSignedTransaction()
여기에는
"from": "0x77777777777",
"to": "0xaE4420931845b0e3B0A7414D597aBB26B522Cf57",
"data": "0x60fe47b100000000000000000000000000000000000000000000000000000000000004d2",
"gasLimit": "0x7530",
"gasPrice": "0x4e20"


+  비밀키 privateKey 까지 합쳐져서 보내야 한다
+ nonce 값
# nonce 값 구해오는 방법
가나쉬에 있는 tx count 값을 가져온다는것
-계정별로 가져오는
const txCount = await web3.eth.getTransactionCount(from)누구의 TX COUNT 를 가져올거냐 ? from 을 가져와야함
nonce : web3.utils.toHex(txCount),
이렇게 hex 값으로 바꿔서 nonce 를 채워준다.
# private key 포함하기
App.js 위에 선언
const ethTx = require('ethereumjs-tx').Transactionconst tx = new ethTx(txObject)
console.log(tx);
res.json({
success : true,
rawTx : tx
})이렇게 하고 post man 으로 확인해보자..

# 개인 키 값을 넣어줘야 한다.
const tx = new ethTx(txObject)
const privateKey = Buffer.from('245cf62e8735de5ada3c58c4a99e1684c6b3344ce0d8250184267d56f1d3272f','hex')  // 비밀키를 넣어준다.
tx.sign(privateKey)       // 개인키값
const serializedTx = tx.serialize()
console.log(serializedTx);

res.json({
    success : true,
    rawTx : tx,
    a : serializedTx.toString('hex')
})
const txhash = await web3.eth.sendSignedTransaction(`0x`+serializedTx.toString('hex'))
res.json({
    success : true,
    txhash
})'웹 개발 > 블록체인' 카테고리의 다른 글
| [블록체인] 오픈제펠린을 이용해서 토큰 생성, 테스트넷 배포 (0) | 2021.10.20 |
|---|---|
| [블록체인] GAS란 ? ERC20 토큰 생성 ? (0) | 2021.10.18 |
| [블록체인] Dapp 사용의 전반적인 흐름 (0) | 2021.10.18 |
| [블록체인] truffle React 사과 가게 연습 (0) | 2021.10.14 |
| [블록체인] 메타마스크 사용 연습 (0) | 2021.10.13 |


