
dukDukz
21.04.20 get , post - html 파일 열기 본문
1. nunjucks 사용방법
포트를 열었을 때 html 파일을 주는법
① 열릴 html 파일 생성
- views라는 폴더 생성
- index.html 생성
- body 안에 hello world! {{title}}라고 작성 후 저장
② nunjucks 설치
터미널에서 npm install nunjucks chokidar 입력
③ nunjucks 사용
.js 파일에서
const nunjucks = require('nunjucks');


//setting
nunjucks.configure('views',{
    express:app,
    autoescape:true,
});
app.set('view engine', 'html');


app.get('/',(req,res)=>{
    res.render('index.html', {title:'hello'});
});
* render 렌더링이란?
참고 블로그
html 파일을 보이게 해줌
{title:'hello'} : html 안에 있는 title 부분에 hello를 넣어줌
서버를 껐다가 다시 실행

2. 요청 req
1) req.query.@

(요청=req , 응답=res)
app.get('/',(req,res)=>{
    // localhost:3000/?name=asdf&id=web7722&pw=1234
    console.log(req.query.name);    //이 부분은 요청 부분임!!!
    console.log(req.query.id);
    console.log(req.query.pw);
    res.render('index.html', {title:'hello'});
});
1. 코드에서 요청
2. url에 원하는 값 입력
3. 터미널 콘솔에 요청 값들 출력된거 확인 가능
query란?
쿼리란 데이터베이스에 정보를 요청하는 것이다.
쿼리는 웹 서버에 특정한 정보를 보여달라는 웹 클라이언트 요청(주로 문자열을 기반으로 한 요청이다)에 의한 처리이다.
2) req.qurey.@ / index.html 수정

test.js
app.get('/',(req,res)=>{
    // localhost:3000/?name=asdf&id=web7722&pw=1234

    res.render('index.html', {
        title: req.query.name,
        user_id : req.query.id,
        user_pw : req.query.pw
    });
});
index.html
<!DOCTYPE html>
<html lang="en">
<head>
<meta charset="UTF-8">
<meta http-equiv="X-UA-Compatible" content="IE=edge">
<meta name="viewport" content="width=device-width, initial-scale=1.0">
<title>Document</title>
</head>
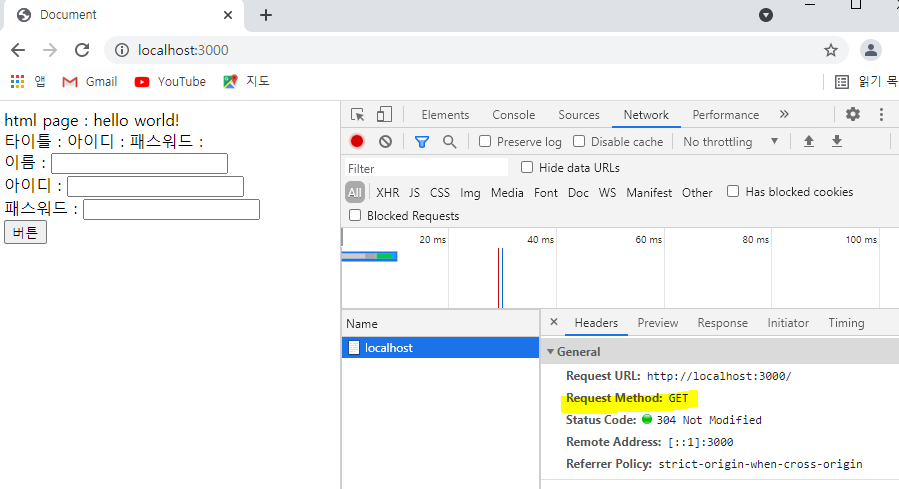
<body>
html page : hello world! <br>
타이틀 : {{title}}
아이디 : {{user_id}}
패스워드 : {{user_pw}}
</body>
</html>
queryString
localhost:3000/?name=asdf&id=web7722&pw=1234
queryString -> URL 에 내용을 담는 변수
[도메인] -> naver.com
naver.com -> localhost:3000
[도메인]?변수=값&변수=값&변수=값 .... 이게 queryString
express 가 name=asdf&id=web7722&pw=1234 이 부분을 잘라서 준다.
그리고 이 부분을 Object로 만들어준다 json으로
name :asdf
id = web7772
pw=1234
접근 방식
요청 req에서 query라는 곳에 내용을 담아준다.
query {
name :asdfid = web7772
pw=1234
}
querySting 쓰려면 노가다해야하나?
이것도 간단하게 만드는 방법이 존재한다
HTML 이 가능하다
.html 가서
form으로 만들 수 있다.
HTML 에서 form 만들어서 값 받아오는 방법

index.html
    <form method="get" id="" action="http://localhost:3000">
        이름 : <input type="text" name="name"><br>
        아이디 : <input type="text" name="user_id"><br>
        패스워드 : <input type="password" name="user_pw"><br>
        <input type="submit" value="버튼">
        <!--<button>과 동일하지만 이걸 누르면 이 form 이 실행된다-->
    </form>
HTML
form 안에 있는 input 내용을 action 쪽에다가 링크 이동을 시킨다.
name에 값을 담아서 보낸다.
name = 이혜준
user_id = jjun
user_pw = 1234
submit 버튼을 누르게 되면 저 값들을 담아서 링크 이동을 시켜준다.
http://localhost:3000/?name=이혜준&user_id=jjun&user_pw=1234 로 링크 이동
form을 통해서 get으로 값을 보낸다
url 이 바뀌어서 서버로 간다.
HTML이 보인다는 것은 무조건 앞에서 Server를 거쳤다는 뜻이다.
HTML 에서 링크 이동이란 뜻은 무조건 다시 Server로 갔다는 것이다
다시 Server가 값들을 들고 HTML 에 뿌려준다.
Q. 아이디와 패스워드 부분은 왜 html에 적히지 않을까?
HTML 과 Server의 상호작용
HTML -> submit 버튼(page를 reload = action) - > Server(server.js) -> 다시HTML에 뿌려준다
그런데 req.query.id/pw 라고 적어주었다.
그래서 다시 html로 보내줄 때, user_id user_pw 로 보낸 값을 못받아 왔다.
이 부분을 바꿔주면 html 부분에 적힐 것이다. (server 재 실행하면)
res.render('index.html', {
        title: req.query.name,
        user_id : req.query.user_id,
        user_pw : req.query.user_pw
}); 
변수명 동일하게 해주기
.html
타이틀 : {{title}}
아이디 : {{id}}
패스워드 : {{pw}}
.js
app.get('/',(req,res)=>{
    res.render('index.html', {
        title: req.query.name,
        id : req.query.user_id,
        pw : req.query.user_pw
    });
});
여기서 변수 명을 맞춰줘야 한다.
js에서 선언한 변수 명을 html에서 {{ }} 써주면 된다.
req.query.@
여기 뒤에 달린 user_id user_pw는 form 에서 받아오는 값과 동일하게 변수명을 맞춰줘야 한다.
POST
get은 url에 내용을 담는거라면
post는 body에 내용을 담는다.
    <form method="POST" id="" action="http://localhost:3000">
        이름 : <input type="text" name="name"><br>
        아이디 : <input type="text" name="user_id"><br>
        패스워드 : <input type="password" name="user_pw"><br>
        <input type="submit" value="버튼">
        <!--<button>과 동일하지만 이걸 누르면 이 form 이 실행된다-->
    </form>
method를 post로 바꿔주면 됨
하지만 .js에서 app.get으로 받아왔기 때문에 결과가 cannot post가 나옴
그래서 .js에
app.post('/',(req,res)=>{
   res.send('post로 왔나?');
});
이걸 써주면 동작이 된다.
한 주소에 여러 페이지를 보여줄 수 있다
post ) 이름,아이디,비밀번호 받아오는 법
HTML -> Server
post로 보내면 Nodejs는 내장함수로 처리를 못한다.
이를 해결하기 위해 (post를 처리하기 위해서)
body-parser 를 설치해야 한다.
1. 서버 끄고
2. 터미널에 npm install body-parser
// 선언
const bodyParser = require('body-parser');

// 사용
app.use(bodyParser.urlencoded({extended:false}));


app.post('/',(req,res)=>{
    console.log(req.body);
    res.send('post로 왔나?');
});
express 안에있는 use라는 메서드 실행시키겠다. url을 encoded하겠다.
이 한줄은 외워야 하는 부분 (post사용을 위해서)
페이지에서 이름,아이디,비번 입력해서 submit 하면
post로 왔나? 라는 페이지가 뜨고 콘솔창에는 이렇게 뜬다.
[post로보냈던 body내용만 추출]

post 로 받아와서 콘솔창에 뜨는 모습

참고 - post만 동작하는데도 get을 써줘야 하나?
post 만으로는 처음 받아오는게 안됨
처음에 요청하면 무조건 get으로 받아온다
(최초의 요청은 무조건 get으로 받아옴)
그래서 get값을 js에서 없애면 페이지가 안나온다.

* 과제
MariaDB 다운로드해서 설치 - db를 생성하는것 까지
DBMS
--무료--
postgreSQL
MariaDB
--유료--
Mysql
Oracle
'웹 개발 > Node JS' 카테고리의 다른 글
| 21.04.27 Router로 파일 쪼개기 2 (0) | 2021.04.27 |
|---|---|
| 21.04.27 Router 로 파일 쪼개기 (0) | 2021.04.27 |
| 21.04.26 게시판 번호 처리 (0) | 2021.04.27 |
| 21.04.20 login - Add user 페이지 (0) | 2021.04.20 |
| 21.04.19 Node JS (6) | 2021.04.19 |

